
Hier möchte ich kurz erklären wie man auf einen Linux-Server/Raspberry oder VPS ein kostenloses SSL-Zertifikat installiert und dieses für NodeRed und Grafana konfiguriert.
- sudo apt-get update
- sudo apt-get upgrade
- apt install certbot
- sudo certbot certonly –manual –preferred-challenges dns –agree-tos –server https://acme-v02.api.letsencrypt.org/directory
- Nun müsst ihr noch eine valide Mailadresse angeben.
- Nun noch die zu sichernde Domäne in meinem Fall *.imakeyouintelligent.co.
Ihr erhaltet nur eine Meldung „Please deploy a DNS TXT record under the name“ diese Infos packt ihr an eure Domäne.
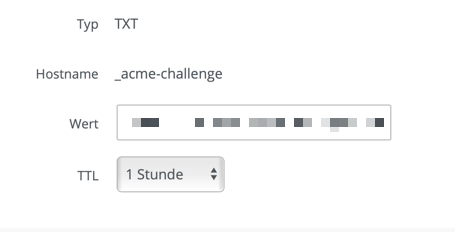
Wenn Ihr die Änderungen beim Hoster an der Domäne durchgeführt habt, bestätigt in eurem Terminal-Fenster mit Enter. Nun sollte es folgende Meldung geben im unteren Bereich findet Ihr den Pfad wo die Zertifikate abgelegt wurden:
Press Enter to Continue
Waiting for verification…
Cleaning up challenges
IMPORTANT NOTES:
– Congratulations! Your certificate and chain have been saved at:
/etc/letsencrypt/live/imakeyouintelligent.com/fullchain.pem
Your key file has been saved at:
/etc/letsencrypt/live/imakeyouintelligent.com/privkey.pem Your cert will expire on 2019-06-19. To obtain a new or tweaked version of this certificate in the future, simply run certbot again. To non-interactively renew *all* of your certificates, run „certbot renew“
– Your account credentials have been saved in your Certbot configuration directory at /etc/letsencrypt. You should make a secure backup of this folder now. This configuration directory will also contain certificates and private keys obtained by Certbot so making regular backups of this folder is ideal.
Nun binden wir das Zertifikat an NodeRed und Grafana.
Für NodeRed fügt bitte entsprechend euere Config folgendes ein: In die Datei: nano node-red/settings.js
ACHTUNG PFAD ZUM ZERTIFIKAT ANPASSEN:
https: {
key: fs.readFileSync(‚/root/zertifikate/privkey.pem‘),
cert: fs.readFileSync(‚/root/zertifikate/cert.pem‘),
ca: fs.readFileSync(‚/root/zertifikate/fullchain.pem‘)
},
requireHttps: true,
Und nun noch die Einbindung in Grafana:
Ruft hierzu die Datei: sudo nano /usr/share/grafana/conf/defaults.ini auf, in diese muss nun folgendes entsprechend euere Werte/Zertifikate.
################################## Server ##############################
[server]
# Protocol (http, https, socket)
protocol = https
# The ip address to bind to, empty will bind to all interfaces
http_addr =
# The http port to use
http_port = 443
# The public facing domain name used to access grafana from a browser
domain = imakeyouintelligent.com
# Redirect to correct domain if host header does not match domain
# Prevents DNS rebinding attacks
enforce_domain = false
# The full public facing url
root_url = %(protocol)s://%(domain)s:%(http_port)s/
# Log web requests
router_logging = false
# the path relative working path
static_root_path = public
# enable gzip
enable_gzip = true
# https certs & key file
cert_file = /root/zertifikate/cert.pem
cert_key = /root/zertifikate/privkey.pem
# Unix socket path
socket = /tmp/grafana.sock
Im Anschluss solltet Ihr den Server einmal durchstarten, oder die einzelnen Services der Applikationen.